Every well-designed shower begins beneath your feet. The shower pan serves as both the structural foundation and the waterproof barrier that makes the entire enclosure possible, yet it’s one of the most overlooked elements in bathroom planning. For interior designers, the challenge is familiar: a client envisions a spacious, spa-like retreat, but the bathroom footprint tells a different story. Navigating this tension between aspiration and reality starts with understanding standard shower pan dimensions — the essential framework that determines what’s achievable in any given space.
Whether you’re designing a compact urban bathroom or a luxurious primary suite, knowing your dimensional options unlocks both efficiency and creativity. This article provides a comprehensive guide tailored to design professionals, covering the most common shower pan sizes and how they integrate into modern bathroom aesthetics. You’ll find strategies for optimizing tight layouts, guidance on when custom enclosures make sense, and actionable steps for specifying the right product every time. Consider this your go-to reference for turning dimensional constraints into design opportunities.
Understanding Standard Shower Pan Dimensions
Standard shower pan dimensions refer to the pre-manufactured sizes that fit the majority of residential and commercial bathroom configurations. The most common square options include 32×32 and 36×36 inches, ideal for compact enclosures, while rectangular pans typically come in 48×36, 60×32, and 60×36 inches to accommodate walk-in designs. Neo-angle pans, usually 36×36 or 38×38 inches, are engineered specifically for corner installations where two walls meet at a right angle. These shapes — square, rectangular, and neo-angle — cover roughly 90 percent of standard bathroom scenarios.

Materials range from lightweight acrylic and fiberglass, which offer affordability and easy installation, to solid surface composites and cast stone that deliver a premium feel underfoot. Each material handles drainage slope and waterproofing differently; acrylic pans come pre-sloped to a centered or offset drain, while composite options may allow more flexibility in drain positioning.
These standards exist because they align with common framing dimensions, simplify supply chains, and ensure compatibility with off-the-shelf glass enclosures and door systems. For interior designers, this means reliable lead times and predictable installation requirements. Understanding these baseline specifications gives you a dependable starting point — a dimensional vocabulary that streamlines communication with contractors, suppliers, and clients alike, ensuring every project begins on solid ground.
Bathroom Design and Modern Bathrooms: Integrating Shower Pans
The shower pan you select doesn’t exist in isolation — it anchors the entire bathroom’s spatial logic. In layout planning, the pan’s footprint dictates where walls terminate, how door swings clear adjacent fixtures, and whether a vanity can accommodate double sinks or must settle for one. A 60×36-inch rectangular pan, for instance, creates enough visual weight to serve as the room’s focal point in an open-concept wet room, while a 32×32-inch pan recedes into a supporting role, freeing floor area for a freestanding tub or expanded storage.

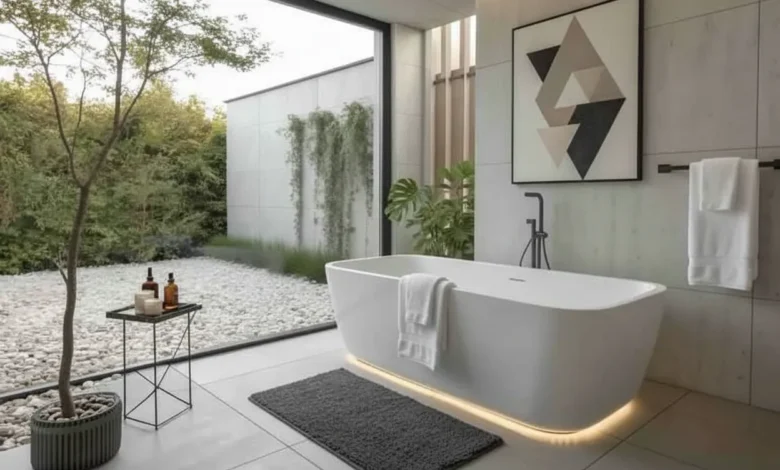
Modern bathroom trends lean heavily toward frameless glass enclosures, curbless entries, and linear drain aesthetics. Standard pans can support these directions when chosen strategically. Walk-in configurations pair naturally with 48×36 or 60×32 pans, offering enough interior space for comfortable movement without a door. Fixture coordination matters here: showerhead placement, body spray zones, and bench seating all depend on the pan’s usable interior dimensions. Material selection also plays a role in the overall design narrative — a matte white solid-surface pan reads differently than a textured slate-finish composite, even at identical dimensions.
Aesthetic Alignment with Contemporary Styles
Specific standard sizes map directly onto popular design themes. A 36×36-inch pan suits minimalist urban bathrooms where clean geometry and tight proportions create intentional restraint. Pair it with a frameless fixed glass panel and matte black hardware for a gallery-like effect. Larger 60×36 pans accommodate transitional and spa-inspired schemes, providing room for niched shelving and rain showerheads without crowding. Color and finish options have expanded considerably — warm grays, concrete tones, and even wood-look textures allow designers to coordinate the pan surface with wall tile and flooring selections, ensuring the base reads as an integrated design element rather than a utilitarian afterthought.
Space Optimization with Standard Shower Pans
Getting the most from a tight bathroom doesn’t require exotic solutions — it requires disciplined planning with the right standard pan. Strategic placement is the first lever designers should pull. Positioning a 32×32-inch square pan in a corner frees the longest uninterrupted wall for a vanity and mirror, preserving sightlines that make the room feel larger than its square footage suggests. Neo-angle pans take this further by cutting the corner diagonally, reclaiming floor space that a square footprint would consume while still providing a comfortable shower interior. In bathrooms under 40 square feet, this geometry can be the difference between a workable layout and a cramped one.
Pairing the shower pan with smart storage eliminates the need for bulky furniture that eats into circulation space. Recessed niches built into the shower walls, a narrow floating shelf beside the enclosure, or a vanity with integrated towel storage all keep essentials accessible without competing for floor area. A 48×36-inch rectangular pan, oriented along the room’s shorter wall, can create a surprisingly generous shower zone while leaving enough depth for a toilet and pedestal sink opposite.
Accurate measurement is non-negotiable. Before specifying any pan, confirm the rough-in dimensions wall to wall, verify drain location relative to floor joists, and account for finished wall thickness — tile backer and tile can consume over an inch per side. Measure twice at both the floor and at 36 inches above it, since older walls rarely run perfectly plumb. Document ceiling height as well, particularly for glass enclosure compatibility. These steps prevent expensive field modifications and ensure the standard pan you specify drops cleanly into the space, delivering the spacious feel clients want without a single wasted inch.
Custom Shower Enclosures: When Standard Isn’t Enough
Standard dimensions handle most projects, but certain situations demand a departure from the catalog. Attic bathrooms with sloped ceilings, historic homes with non-orthogonal walls, and ADA-compliant designs with specific clearance requirements all present geometries that no off-the-shelf pan can address. High-end residential clients frequently request oversized enclosures — 72×48 inches or larger — with integrated benches, multiple drain points, or flush-mount installations that sit perfectly level with surrounding floor tile. In these cases, custom shower enclosures become not just preferable but necessary to preserve the design intent.
The benefits of going custom extend beyond fit. Designers gain control over material composition, surface texture, drain placement, and edge profile. A custom pan can be fabricated from solid surface material in a precise color match to the countertop, or formed from reinforced mortar with an integrated waterproof membrane for a true wet-room aesthetic. However, these advantages come with trade-offs. Custom fabrication typically adds two to six weeks to the project timeline and increases cost by 40 to 100 percent compared to standard alternatives. The design flexibility is substantial, but it requires earlier decision-making and tighter coordination between the designer, fabricator, and installer to avoid delays.
Sourcing and Specifying Custom Products
Finding the right fabricator starts with targeted research. Look for manufacturers who specialize in custom shower bases rather than general countertop shops offering pans as a sideline — specialization typically means better slope engineering and waterproofing expertise. When evaluating vendors, ask about material warranties, maximum size capabilities, lead times under current demand, and whether they provide shop drawings for approval before fabrication begins. Request physical samples to assess texture and finish quality firsthand. Document every specification in a detailed submittal package: exact dimensions with tolerance ranges, drain size and position measured from two reference walls, threshold height, color code, and surface finish. Have the client sign off on this package before production starts. This disciplined approach protects your design vision and prevents costly remakes, ensuring the custom pan arrives ready to install without surprises on site.
Practical Steps for Designers: Implementing Solutions
Turning dimensional knowledge into executed projects requires a repeatable process. The following framework helps interior designers move confidently from initial consultation to installed shower pan, whether the project calls for a standard unit or a fully custom base.
Start by assessing client needs alongside bathroom constraints. During the first site visit, document the room’s exact dimensions, door locations, window positions, and plumbing rough-ins. Simultaneously, interview the client about daily routines — who uses the shower, whether accessibility is a concern now or in the future, and which aesthetic references resonate. This dual assessment reveals whether a standard 36×36 or 60×36 pan will satisfy the brief or whether unusual geometry and elevated expectations point toward a custom solution.
Next, select between standard and custom dimensions based on your findings. If the bathroom walls are plumb, the layout accommodates a catalog size, and the client’s style aligns with available finishes, a standard pan delivers the best value and fastest timeline. Reserve custom fabrication for projects where spatial irregularities, barrier-free thresholds, or specific material matching make off-the-shelf options unworkable. Home supply providers like GeorgeBuild can be a useful resource when comparing standard pan specifications across multiple manufacturers, helping you narrow down options that align with both budget and design goals.
With the pan selected, integrate it into a comprehensive bathroom design plan. Model the shower enclosure in your drawing software, confirming clearances to the toilet, vanity, and door swing. Specify glass type, hardware finish, showerhead placement, and niche locations relative to the pan’s interior dimensions — every element should reference the base as its anchor point.
Collaboration with contractors and suppliers is where specifications become reality. Share dimensioned drawings and product submittals with the tile installer, plumber, and glass fabricator simultaneously so each trade can flag conflicts before materials are ordered. Schedule a pre-construction meeting to walk through the installation sequence: waterproof membrane first, then pan setting, followed by wall tile and finally glass enclosure. One successful example of this coordinated approach involved a 48×36 standard pan in a 45-square-foot guest bath where early trade alignment eliminated change orders entirely, delivering the project on budget and two days ahead of schedule. Repeating this disciplined workflow across projects builds your reputation for designs that look exceptional and install without friction.
Turning Shower Pan Dimensions Into Design Confidence
Mastering standard shower pan dimensions gives interior designers a reliable foundation for every bathroom project. The common sizes — from compact 32×32-inch squares to generous 60×36-inch rectangles — form a dimensional vocabulary that streamlines specification, simplifies contractor communication, and ensures predictable timelines. When integrated thoughtfully into modern bathroom layouts, these standard options support contemporary aesthetics from minimalist urban enclosures to spa-inspired retreats, all while keeping budgets grounded in reality.
Space optimization becomes intuitive once you understand how each pan shape interacts with surrounding fixtures, circulation paths, and storage needs. And for those projects where catalog dimensions simply cannot resolve unusual geometries or elevated client expectations, custom fabrication offers a clear path forward — provided you approach it with disciplined documentation and early coordination. The designer who commands both standard and custom options holds a significant advantage, delivering bathrooms that feel intentional and effortless regardless of the constraints involved. As barrier-free designs, sustainable materials, and integrated wellness features continue reshaping bathroom expectations, staying current with dimensional possibilities ensures your work remains both innovative and executable.