If you’ve ever watched your handheld footage back and winced at the shaky, jittery results, you’re not alone. Unstable video screams amateur, no matter how good your composition or lighting might be. The camera shoulder rig offers a transformative solution: a stable, ergonomic platform that distributes weight across your body while delivering smooth, professional footage. For film students, indie creators, and aspiring filmmakers working without massive budgets or crew support, a well-designed shoulder rig becomes an indispensable tool. This guide will walk you through everything you need to know about selecting, building, and using an ergonomic shoulder rig system. You’ll learn how core components like a stable camera rig foundation, the critical 15mm rod clamp for adjustability, and a properly fitted shoulder pad work together to create a setup that’s both affordable and effective. By the end, you’ll have actionable steps to build an optimal rig that keeps your footage steady and your body comfortable through long shooting days.
Why a Shoulder Rig is Essential for Modern Video Production
A camera shoulder rig is a support system designed to rest on your shoulder, transferring the camera’s weight from your arms to your upper body and core. Unlike pure handheld shooting where your arms bear the entire load and micro-movements translate directly into visible shake, a shoulder rig creates a stable three-point contact system: shoulder, hands on grips, and often your face against a viewfinder or monitor. This physical connection dramatically reduces unwanted camera movement, delivering footage that appears intentional and controlled rather than accidentally jittery.
The ergonomic advantages extend far beyond image quality. When you’re holding a camera at arm’s length for extended takes, fatigue sets in quickly. Your muscles tire, your grip weakens, and shake increases precisely when you need steadiness most. A properly balanced shoulder rig redistributes weight across larger muscle groups and skeletal structure, allowing you to shoot comfortably for hours instead of minutes. This improved posture prevents the neck and back strain that plagues handheld operators, making long documentary interviews or event coverage genuinely sustainable.
Beyond stability and comfort, a shoulder rig transforms into a modular platform for professional accessories. The rod system provides mounting points for follow focus units, external monitors for better framing, shotgun microphones for quality audio, and LED panels for on-the-go lighting. For film students and indie creators working without dedicated crew members, this all-in-one solution means you can operate camera, monitor focus, and control audio simultaneously. When budgets are tight and schedules demanding, a versatile shoulder rig becomes the difference between compromised footage and professional results that compete with better-funded productions.
Core Components of an Ergonomic and Stable Camera Rig
The Foundation: Shoulder Pad and Mounting System
The shoulder pad serves as your body’s primary contact point with the entire rig system, making it the most critical component for comfort during extended shoots. Quality pads use dense foam or gel cushioning that conforms to your shoulder’s natural contour, distributing weight evenly across a broader surface area rather than concentrating pressure on a single point. The shape matters considerably: curved pads that wrap slightly around your shoulder provide superior stability compared to flat designs that can slip during movement. Adjustability is essential, as you’ll need to accommodate different clothing thicknesses across seasons and shooting conditions. The pad connects to the rig’s spine or baseplate through a secure mounting bracket, which should offer some degree of height and angle adjustment to match your body’s proportions and preferred shooting stance.
The Structural Backbone: 15mm Rods and the Vital 15mm Rod Clamp
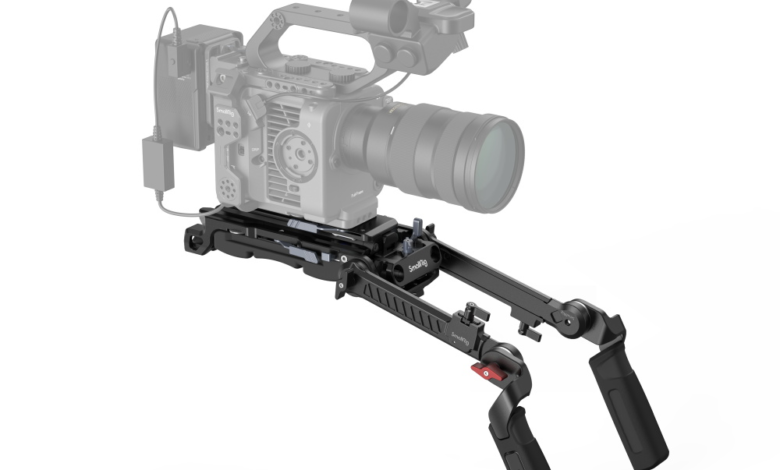
Lightweight aluminum 15mm rods form the skeletal framework of your entire rig, providing standardized mounting points that create a modular, expandable system. The 15mm rod clamp functions as the critical connector that transforms static rods into an adjustable platform, allowing you to slide and lock components precisely where you need them. Single clamps secure individual accessories like handles or microphone mounts, while dual clamps provide rock-solid attachment for heavier elements like the camera baseplate itself. Quality clamps feature large thumb screws or lever-lock mechanisms that provide tool-free tightening with enough clamping force to prevent any slippage during operation. The ability to reposition these clamps along the rod length gives you complete control over weight distribution and accessory placement, making proper balance achievable regardless of your camera’s size or configuration.
Handles, Baseplates, and Camera Mounting
Handles provide essential control points for maneuvering the rig smoothly and maintaining steady framing during dynamic shots. Ergonomic grips with rubberized surfaces reduce hand fatigue and improve control, particularly during long takes or when working in challenging conditions. The baseplate system bridges your camera to the rod framework, typically using a standardized quick-release plate that matches your camera’s bottom mounting threads. This quick-release functionality allows you to detach the camera rapidly for tripod mounting or handheld work without rebuilding your entire rig configuration. Higher-quality baseplates incorporate multiple threaded mounting holes for accessories and offer sliding adjustments that work in conjunction with your rod clamps to achieve perfect front-to-back balance. Together, these components create a stable camera rig platform that remains secure during movement while offering the flexibility to adapt to different shooting scenarios and camera configurations.
Step-by-Step: Building Your First Affordable Shoulder Rig
Step 1: Assessing Your Camera and Budget
Begin by weighing your camera with its most common lens and any essential accessories like a battery grip or external recorder. This total weight determines the robustness you’ll need from your rig components. Cameras under three pounds require only basic support, while setups exceeding five pounds demand sturdier rods and reinforced clamps. Set a realistic budget by identifying your absolute must-haves: shoulder pad, rod system with clamps, and baseplate. Resist the temptation to purchase every available accessory initially. A focused investment in quality core components delivers far better results than spreading funds across numerous mediocre add-ons that compromise your rig’s fundamental stability. Many budget-conscious filmmakers find that manufacturers like SmallRig offer complete starter kits that include all essential components at accessible price points, eliminating guesswork when sourcing compatible parts.
Step 2: Selecting and Assembling Core Components
Start assembly by securing the shoulder pad to your baseplate or rig spine using the provided mounting bracket, ensuring all screws are finger-tight before final tightening with tools. Slide two 15mm rod clamps onto your rods, positioning them approximately where you anticipate the camera’s balance point based on its size. Insert these rods through the baseplate’s rod ports, leaving equal rod length extending forward and backward for adjustment flexibility. Mount your camera’s quick-release plate to its bottom threads, then attach this plate to the baseplate. Add handles to the forward rod sections using additional clamps, positioning them where your arms naturally fall when the rig rests on your shoulder. Methodically tighten every clamp and screw with appropriate force—loose connections create dangerous instability and damage equipment, while over-tightening can strip threads or crack plastic components.
Step 3: Achieving Perfect Balance and Ergonomics
Place the assembled rig on your shoulder and grip both handles in your natural shooting position. The rig should feel neutrally balanced, neither pulling forward nor tipping backward. If the camera dips forward, loosen your rod clamps and slide the entire camera assembly backward along the rods, then retighten and test again. Repeat this adjustment process in small increments until you achieve that sweet spot where the rig feels weightless and stable. Proper balance means you’re guiding the camera rather than fighting it. Next, adjust handle angles by loosening their clamp screws and rotating them until your wrists remain straight and relaxed when gripping. Bent wrists create tension that travels up your arms and into your shoulders, causing fatigue within minutes. Your elbows should hang naturally at your sides rather than splaying outward or cramping inward. Finally, adjust the shoulder pad’s height so the camera’s viewfinder or monitor aligns comfortably with your eye level without requiring you to crane your neck upward or hunch downward. This neutral spine position allows you to operate for hours without developing the chronic pain that plagues poorly configured rigs.
Advanced Techniques and Accessories for Professional Results
Once your basic rig feels balanced and comfortable, strategic accessories can elevate your production quality significantly. A follow focus unit mounts to your rods via 15mm rod clamps and connects to your lens gear ring, allowing smooth, precise focus pulls during shots—essential for narrative work where shifting focus draws viewer attention between subjects. An external monitor attached to the top of your rig transforms framing accuracy, letting you see fine details, check focus critically, and monitor exposure in real time rather than squinting at a tiny camera screen. For audio, a shotgun microphone mounted above the camera on a shock mount captures clean dialogue while remaining accessible for monitoring, eliminating the need for separate audio equipment on smaller productions.
Shooting technique matters as much as hardware. When walking with your rig, adopt a slight knee bend and roll through each step heel-to-toe, letting your legs absorb vertical bounce rather than transmitting it through your rigid torso into the camera. This “ninja walk” creates surprisingly smooth tracking shots without expensive stabilizers. For panning, rotate from your core and hips rather than twisting your upper body, maintaining the rig’s relationship to your shoulder throughout the movement. Tilting requires leaning your entire upper body forward or backward while keeping your neck neutral, preventing jerky pivots that break the illusion of smooth camera movement. When your camera and lens combination creates a front-heavy setup, a small counterweight clamped to the rear rods restores neutral balance, eliminating the constant muscular effort required to prevent forward tipping during long takes.
Building Your Perfect Shoulder Rig Setup
A camera shoulder rig represents far more than just another piece of equipment—it’s a fundamental tool that bridges the gap between shaky amateur footage and stable, professional-quality video while protecting your body from the physical toll of extended shooting. The core components we’ve explored—a properly cushioned shoulder pad for weight distribution, the modular 15mm rod system, and the versatile 15mm rod clamp that makes precise adjustments possible—work together to create a stable camera rig platform that adapts to your unique needs and grows with your skills. For film students and indie creators working with limited budgets, the key is starting simple: invest in quality fundamentals that ensure stability and ergonomics first, then expand your system strategically as projects demand additional capabilities. A well-balanced, comfortable rig disappears from your conscious awareness during shooting, freeing your mental energy to focus on what truly matters—framing compelling shots, capturing authentic performances, and telling stories that resonate with audiences. Master this essential tool, and you’ll find yourself shooting longer, moving more confidently, and delivering results that reflect your creative vision rather than the limitations of your support system.