For amateur photographers looking to elevate their visual storytelling, mastering a camera matte box can transform ordinary footage into cinematic masterpieces. This versatile accessory has long been a staple in professional filmmaking, but its benefits are increasingly accessible to enthusiasts working with consumer-grade equipment.
Understanding how to properly use a matte box opens doors to superior light control, enhanced contrast, and professional-grade image quality that separates amateur work from polished productions. The right techniques can dramatically improve your filming results, helping you capture scenes with the depth and clarity you’ve envisioned.
However, many aspiring filmmakers face a common challenge: finding quality camera accessories that don’t break the bank. Budget constraints shouldn’t limit creative potential, and fortunately, today’s market offers numerous affordable options for those willing to learn the fundamentals.
This guide is specifically designed for amateur photographers ready to expand their technical skillset. Whether you’re shooting with a DSLR matte box setup or exploring rotatable filter stage configurations, you’ll discover practical insights to maximize your equipment’s potential and achieve professional-looking results without professional-level investment.
Understanding the Basics
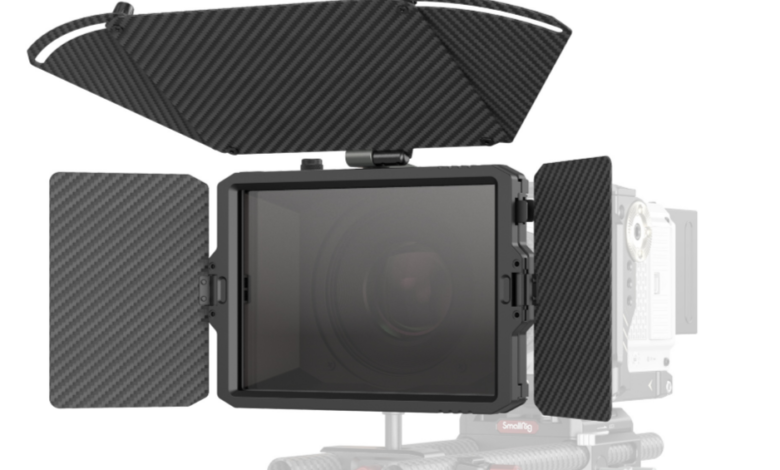
A camera matte box is a rectangular shade attachment that mounts in front of your lens, serving as both a sophisticated lens hood and a filter holder. Unlike simple lens hoods, matte boxes feature adjustable flags or barn doors that block stray light from multiple angles, preventing lens flare and unwanted reflections that can wash out your image. They typically include slots for inserting square or rectangular filters, allowing you to stack multiple effects without the vignetting issues common with circular screw-on filters.
This tool dramatically improves film quality by giving you precise control over how light enters your lens. When shooting outdoors in bright conditions or working with strong backlighting, a matte box protects your footage from contrast-reducing glare that can make images appear hazy or washed out. The result is richer colors, deeper blacks, and improved overall contrast that gives your work a polished, professional appearance.
The main components include the matte box body, which houses the filter stages, adjustable side flags that extend or retract to block light from specific directions, and a mounting system that attaches to your camera’s rod support or lens threads. Many models feature a rotatable filter stage, allowing you to adjust polarizing or graduated filters without removing them from the holder, making real-time adjustments quick and intuitive during shooting.
Choosing the Right Matte Box
When selecting a camera matte box on a budget, start by determining your lens diameter and whether you need a clamp-on model that attaches directly to your lens or a rod-mounted system that connects to 15mm support rods. Clamp-on versions are typically more affordable and work well for lightweight DSLR setups, while rod-mounted options offer greater stability for heavier rigs but require additional support accessories that increase overall cost.
DIY matte boxes constructed from foam board or cardboard can serve as excellent learning tools for understanding light control principles without financial commitment. While these homemade solutions lack durability and precise adjustability, they help you determine whether investing in commercial equipment makes sense for your shooting style. Commercial matte boxes, even budget-friendly models, provide consistent performance with adjustable flags, secure filter holders, and weather-resistant construction that DIY versions simply cannot match for regular use.
Focus on several key features when evaluating options within your price range. Look for a DSLR matte box with at least two filter stages, allowing you to combine neutral density filters with polarizers or graduated filters for maximum creative control. A rotatable filter stage is essential for adjusting polarizing effects without dismounting filters, saving valuable time during shoots. Ensure the model accommodates your preferred filter size, with 4×4 or 4×5.65-inch slots being most common. Check that adjustable side flags move smoothly and lock securely in position, as loose flags become frustrating during active filming. Finally, verify the mounting system matches your camera setup, whether that’s a specific lens thread size or compatibility with standard 15mm rods.
Setting Up Your Matte Box
Begin by attaching your matte box to your camera using the appropriate mounting method for your model. For clamp-on matte boxes, loosen the adapter ring to match your lens diameter, then carefully thread it onto your lens filter threads, tightening securely but not overly tight to avoid damaging the lens threading. Rod-mounted systems require first installing 15mm support rods through your camera’s baseplate or cage, then sliding the matte box onto these rods and positioning it approximately one to two inches in front of your lens. Secure the matte box by tightening the rod clamps evenly on both sides to prevent tilting or wobbling during movement.

Check compatibility by ensuring the matte box doesn’t vignette your image, which appears as darkened corners in your frame. Power on your camera and examine the viewfinder or monitor at your widest focal length, as this is where vignetting most commonly occurs. If you notice dark edges, move the matte box slightly further from the lens or adjust the inner mask size if your model includes interchangeable masks for different lens diameters. Test the adjustable flags by extending them fully and verifying they don’t intrude into your frame when positioned at extreme angles.
Before your shoot, practice inserting and removing filters from the slots to familiarize yourself with the mechanism, as fumbling with filters during critical moments wastes time and opportunities. Verify that your matte box remains stable when you tilt or pan your camera, tightening mounting screws if you detect any movement. Finally, perform a quick focus check, as adding a matte box slightly shifts your camera’s weight distribution, potentially affecting balance on gimbals or stabilizers that may need rebalancing for smooth operation.
Using Techniques and Tips
When shooting outdoors in bright sunlight, position your matte box with the top flag extended fully to block overhead light that causes lens flare, while adjusting side flags to shield against light coming from the sun’s direction. If you’re filming during golden hour with the sun low on the horizon, angle the appropriate side flag toward the light source and monitor your viewfinder for any stray light streaks that indicate you need further adjustment. For backlit scenarios where your subject stands between the camera and a bright background, extend all flags moderately to create a controlled light tunnel that prevents edge flare while maintaining your subject’s natural rim lighting.

Managing glare effectively requires understanding the relationship between your lens angle and light sources in your environment. Before recording, slowly pan your camera across your intended shooting range while watching for flare or contrast reduction, then adjust flags incrementally until the image remains clean throughout your movement. When working with reflective surfaces like water or glass buildings, combine your matte box with a polarizing filter in the rotatable filter stage, turning it while observing your monitor until reflections minimize and colors deepen. This combination provides superior glare control compared to using either tool independently.
Position your matte box closer to the lens when using wide-angle focal lengths to avoid vignetting, but move it slightly forward when switching to telephoto lenses, as longer focal lengths are more forgiving with matte box placement. In indoor environments with mixed lighting, use flags to block practical lights or windows that aren’t part of your intended lighting scheme, creating cleaner shadows and more directional light that adds dimension to your shots. For run-and-gun documentary work, keep flags in a neutral semi-extended position that provides general protection, allowing quick adjustments as lighting conditions change without completely reconfiguring your setup. Always check your frame edges when adjusting flags during active shooting, as it’s easy to accidentally intrude into the visible area when making rapid changes, especially when working with wider aspect ratios or when focused intently on your subject rather than your technical setup.
Advanced Techniques
Experienced cinematographers layer multiple filters within their matte box to achieve complex effects that single filters cannot produce. Combine a neutral density filter in the first stage with a graduated ND in the rotatable second stage to balance bright skies while maintaining overall exposure control, rotating the graduated filter to align the transition line precisely with your horizon. Stack a polarizer behind a subtle warming filter to simultaneously reduce reflections and add golden tones to outdoor scenes, creating atmosphere without post-production color grading. When using this stacking approach, always place your strongest ND filters closest to the lens to minimize potential light scatter between filter surfaces.
For creative applications, use your matte box flags as makeshift barn doors to create intentional vignettes or directional shadows that add mood to your compositions. Position one side flag partially into your frame’s edge to create a natural-looking foreground obstruction that adds depth, simulating the effect of shooting through doorways or foliage without physically placing objects near your lens. During interviews or narrative work, angle flags to subtly darken one side of your frame, drawing viewer attention toward your properly exposed subject while creating cinematic contrast ratios that elevate production value.
Experiment with unconventional filter materials by cutting gel filters or diffusion materials to fit your matte box slots, opening creative possibilities beyond standard glass filters. Insert a light diffusion gel in the stage furthest from your lens to soften harsh sunlight while maintaining sharpness, or use colored gels to introduce subtle color casts that establish mood without overwhelming your scene. This approach allows affordable experimentation with effects that would otherwise require expensive specialty filters, encouraging creative exploration within budget constraints.
Common Mistakes to Avoid
One frequent error is positioning the matte box too close to the lens when using wide-angle focal lengths, causing visible vignetting that darkens frame corners and creates an unprofessional appearance. To fix this, move the matte box forward incrementally while monitoring your viewfinder until the dark edges disappear, or switch to a larger inner mask if your model includes interchangeable masks designed for wider lenses.
Many beginners over-extend flags into their frame without realizing it, especially when making quick adjustments during active shooting. This mistake creates unintended shadows or dark intrusions at frame edges that ruin otherwise perfect takes. Always check your entire frame composition after adjusting flags, paying particular attention to corners where extended flags most commonly intrude, and develop the habit of doing a quick frame-edge scan before pressing record.
Another common issue is neglecting to secure mounting hardware properly, resulting in a loose matte box that shifts during camera movement and causes inconsistent light control or annoying rattling sounds that contaminate audio. Before each shoot, verify that all clamps, screws, and locking mechanisms are tightened adequately, and periodically recheck them during extended filming sessions, as vibration and handling can gradually loosen connections. If you’re building a complete camera rig, manufacturers like SmallRig offer rod support systems and mounting accessories that integrate seamlessly with various matte box models, ensuring stable connections across your entire setup.
Finally, photographers often use incompatible filter sizes that don’t fit securely in their matte box slots, causing filters to rattle or fall out during movement. Invest in proper filter trays or adapter frames that match your matte box specifications, ensuring filters sit firmly without gaps that allow light leaks or create handling frustrations during critical shooting moments.
Take Your Filmmaking to the Next Level
Mastering a camera matte box represents a significant step forward in your filmmaking journey, transforming how you control light and elevate your visual storytelling. Throughout this guide, we’ve explored the fundamentals of what matte boxes are and how they function, examined strategies for selecting budget-friendly options that match your equipment, and detailed practical setup procedures that ensure proper installation. You’ve learned essential techniques for managing glare and positioning your matte box across various shooting scenarios, discovered advanced methods for combining filters and creating cinematic effects, and identified common pitfalls that can undermine your results.
The importance of mastering this tool cannot be overstated—it’s the difference between amateur footage and polished, professional-looking productions that command viewer attention. While the learning curve may seem steep initially, consistent practice with your matte box will quickly develop your intuition for light control and filter management. Don’t hesitate to experiment with different flag positions, filter combinations, and creative applications beyond conventional uses. Start with simple outdoor shoots to build confidence, gradually progressing to more complex lighting situations as your skills develop. Remember, every professional cinematographer once stood where you are now, and your willingness to learn and practice will ultimately define your growth as a visual storyteller.